Step #1 Pencil Sketch

I started off by scanning in this pencil sketch at 300 dpi, then modifying the Effects> Tonal Control> Brightness / Contrast to eliminate the muddy gray areas. Then go to Select>Auto Select. in the Auto Select dialog box, use Image Luminance and click OK. Next, I copy and paste that layer (ctrl+C>ctrl+shift+V). This made the white areas of the sketch transparent. However, it produced a washed-out version of the original sketch. To correct this, I selected the sketch layer in the Layer palette then filled (Effects> Fill...(ctrl+f) with black. This restored the sketch to its original tonality. At this point I now had a floating version of my pencil sketch that was transparent in its white areas. This allowed me to paint on the canvas below and not disturb the sketch floating above.
Step #2 Rough Background Painting
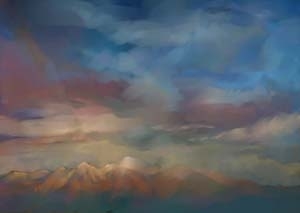
Before painting the character's head, I put down a rough background on the canvas behind the sketch. I used the Opaque Flat brush (Brushes Palette> Brushes> Opaque Flat) to block in the different areas of color in the painting. I turned the opacity down to about 10% using Brush Controls> General> Opacity, which helps the brush strokes build up a variance of color as they're applied over each other. As far as color goes, I try to use fairly saturated colors because I can always tone it down later, and it's harder to go the other way. After I blocked in the clouds and mountains I was ready to move onto the next stage.
Step #3 Rough Background with Sketch

Now that the background was roughed in, I could start on blocking in the colors for all of the elements in the foreground. At this point, I selected the sketch layer in the Objects> Layers palette and dialed the Opacity down to about 60%. This helps me see what's going on with the colors underneath. Once I had all the colors blocked in, I had to select the sketch layer to collapse it with the canvas (Objects> Layers> Drop) so I could start the long process of "noodling out" all of the edges. The end goal is to get rid of most of the sketch lines. The next part took the longest, but I feel it's the most rewarding.
Step #4 Rough Colors on Subject
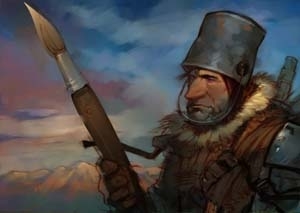
After the larger areas were blocked in, I used Brushes Palette> Brushes> Digital Airbrush set at a small size in Brush Controls> Size (5 or less) and a high opacity in Brush Controls> General> Opacity (80% or greater) to add highlights and render out the detailed areas. To work color into dull areas, I used a big (30 or greater) airbrush at a low opacity (10%), and lightly applied a saturated color. To blend rough edges, I used a variant like Brushes Palette> Brushes>Smeary Round. This brush smears and blends any existing color on the canvas with light pressure and applies the Current Color to the canvas with increased pressure. The individual brush hairs of the Smeary Round brush provide a "painterly" quality.
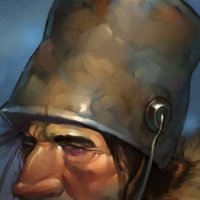
Step #5 Final Details

Next came the finishing touches. This is the polishing stage where I focus on the highlights of the paintbrush, the guy and his can... I always save the highlights for last.


17 comments:
thank you! awesome stuff mr. woody
Ive always been a fan of your paints sir and this is soooooooooooooo helpful! You and Sam have been most inspirational with the knowledge. Thanks for sharing! Hats off to you
Very nice step by step. I commented in a previous post that when I got rid of the painter can I clipped this gem out and still have it on my bulletin board as inspiration. It was a surprise to see that you paint the full background before you start the figure. Need to try this...it really makes sense.
Thanks for sharing your process man. This is some seriously interesting stuff. I hope you consider posting something like this again!
Sounds easy enough... now that I have all the steps, all I need is the skill. Crap.
Thanks for the comments, you guys. Hopefully I can do a more up-to-date one later. Thanks again for stoppin' by.
I've been hoping you would post something like this! Now I just have to get Painter. Maybe I can drop hints around my wife. The birthday is just around the corner!
I became a fan when I first saw this published a while back! Thanks for the tutorial! Terrific!
Amazing work you have here Ryan!
This is a cleaver and generous tutorial. I was allways confused about the proper way to use a scanned sketch. It is also remmarcable the way you achieved the oily effect with the brushes present in an early edition of Painter.
I'll keep visiting to enjoy and learn. Thank you!
Wow, this is great. I'm so glad you did this. I'm deathly afraid of computers, now I may be delusional enough to give it a shot. Amazing work!
Wow. Thanks for sharring you process. Always interesting and definitely well done.
Wow,
Great work. You create such illusive atmospheres. I llove it very much!
Even a humble pencil sketch is out of this world! Your art is just awe inspiring!
Thank you very much!
I'm used to Photoshop but painter always was a little bothersome until I read this tutorial. My problem was getting rid of the line work which you addressed.
thanks again, I will keep checking out your blog for new art and with luck a few more tips!
jordan
Dear Ryan -
Your artwork is incredible. 'Reminds me a little of Gary Locke's stuff (e.g. http://www.garyartgood.com/Folio_Characters.php?NowShowing=9), although you specialize in skulls and witches...
I'd love to see a series of tutorials, if you're willing to share additional details on your method. 'Wonderful stuff, and so glad you're blogging.
Take care,
Steve
Incredible. I do not understand, did you painted the background too from scratch, or you just pasted a finished background from somewhere else?
Post a Comment